 No, I haven’t lost my mind. This is the time of asters, dahlias, and mums (and if you only grow that last one, you need to give the others a try…). But it’s also when you need to be thinking about spring bulbs, because if you don’t think about them now, you’ll only be able to admire them in other people’s yards come spring. So it’s time to do some planning, ordering, and digging for spring. (Throw in a little hoping and praying too, as planting bulbs is one of the bigger acts of faith that gardeners perform!)
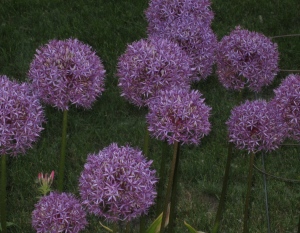
Allium “Globemaster”
There are many, many kinds of bulbs, from tiny flowers like crocuses and scilla and grape hyacinth that are great in small places like rock gardens, or along spaces where you walk frequently, to outer-space looking fritillaria and allium, to what I call the “big three” –daffodils, tulips, and lilies. If you are just getting into growing bulbs, these are the showstoppers that can be seen from indoors or from the street, and make fabulous cut flowers. They are a great place to begin getting to know bulbs because you get big impact for the effort.
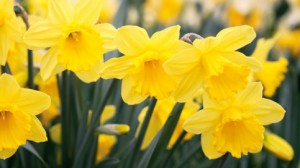
King Alfred-style Daffodils
Daffodils: There are a lot of poems about daffodils (second only, perhaps, to roses), and it’s not hard to understand why. Their virtues are many: They are a great combination of very early bloomers (some varieties in late March/early April–no kidding!) and extremely hardy–they can be in full bloom, get snowed on, and keep right on going. They are deer, mole, and vole resistant. And they are economical because they can multiply like crazy and last for years. There seem to be literally hundreds of varieties, so you can get quite creative in designing with daffodils. For me, nothing quite beats the King Alfred-style daff–the one most people would pick out of lineup if you asked them to identify a daffodil. But don’t limit yourself–there are short and tall, large cups and small cups, petals and cups that are contrasting colors, and colors from white to gold and even peach. (Tip: don’t put them in a vase with other flowers, as they will shorten their lifespan. But who needs company when you’re a daffodil–they look great on their own.)

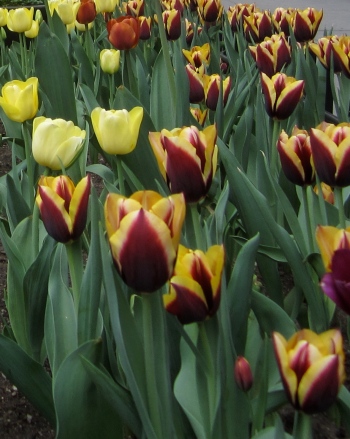
Tulips: While there may not be a lot of poems about tulips, they did inspire a speculative bubble called “tulip-mania” in 17th-century Europe! And while I may not be willing to mortgage my house in order to buy a single tulip bulb, I get why people did. Tulips are fabulous–tall and straight, with flowers that rise beautifully above the foliage; brilliant colors that can be combined to beautiful effect, or massed to look like a field of solid color; and the varieties that make one flower per bulb (which is most of them) are simply regal. That said, however, that fabulousness comes at a price. They are one of the very few plants that are on the higher maintenance end of the spectrum that I am dedicated to. So here are a few tips about getting the most out of tulips, and also about understanding what is reasonable to expect about tulips, so that you aren’t disappointed:
As with daffodils, there are hundreds of varieties–tall and short; early, mid, and late blooming; fringed petals; bi-color petals; flowers shaped like lilies and flowers shaped like peonies; multiple flowers from a single bulb, etc. The vast majority of these tulips are not perennial (coming back year after year, reliably), and they do not multiply easily (create new bulbs at the base of the original bulb. The problem is, that people don’t seem to know that, because everybody knows a patch of tulips that comes back year after year without any attention at all. But those are the exceptions that prove the rule. Most tulips have to be replanted every year. They are also not deer, mole, and vole resistant, so extra care must be taken when planting in order to deter thieves. I hate to hear people think they are terrible gardeners because they’ve had bad experiences with tulips (and this appears to be rather common!)–and the gardening industry really doesn’t do it’s part in educating the public, creating unreasonable expectations.
So, if you are still reading after all this bad news, here are some tips:
1. Don’t buy tulip bulbs in the grocery store or home center. I don’t even buy them in nurseries. The only way to really know what you are getting and to also be assured top quality and top size bulbs is from specialty growers. People often ask me about particular companies, and these four are the ones I recommend from personal experience: these companies supply bulbs that are healthy (not dried out or bruised) and larger in diameter, resulting in larger flowers and longer-lived bulbs for the ones that do rebloom. They also are less expensive when ordering in quantity–which you should do! A dozen tulips is not enough! Just look at the photos on these websites and get inspired:
Brent and Becky’s Bulbs
Colorblends Wholesale Bulbs
White Flower Farm
Bluestone Perennials
2. When you look through the catalogs of the specialty growers, be aware of the coded language. It’s not dishonest, but if you’re not familiar with growing tulips, you may not know what to look for. There are a few categories of tulips that are reliably perennial, and they will always be identified in a catalogue, because this is a very desirable trait. Then there is a category that could be called “semi-perennial”–that is the bulbs will rebloom for about five years. I’ve had excellent success with these varieties and recommend them without reserve. They are hybrids in the Darwin category, which have large “chalice-shaped” blooms, and my favorite is the “Impression” series.
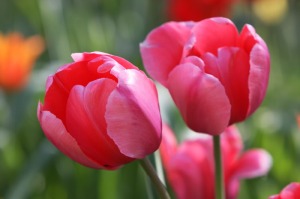
“Pink Impression” Tulips
I’ve tried Impression tulips in various colors and from various sources–“Pink Impression” is the one tulip I cannot live without! You will now see Impression tulips in the grocery store–don’t buy them, they will be small and not very long lived.
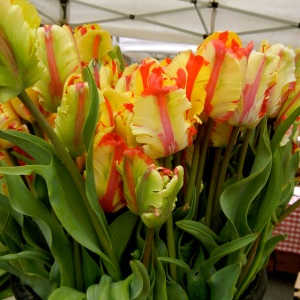
Parrot-type Tulips. The feathery texture of the petals is due to a virus!
3. Sometimes, though, you just really need an exotic tulip. Then the thing to do is plant them in a spot that is high impact and also easily dug up when they are through. I’ve got a three-foot deep strip along my front walk that is perfect for this application–the gorgeous bi-colors and fringed parrot tulips of a Rembrandt painting? This is where they belong! This is also the only place I plant annuals in the ground–so when the tulips are done, out they come and in go the annuals.
4. I once planted 200 tulips in the fall, and only 50 came up in the spring. #$%&! moles! So I always take a couple of precautions now, and haven’t had a repeat of that disaster: make a crushed seashell sandwich for the bulbs. Get a bag of crushed shells from an aquarium supplier, and sprinkle a layer in the bottom of the hole, then add the bulbs and enough soil so you can just see their tips, and then add another sprinkling of shells. The crushed shells reputedly act as a deterrent because they are unpleasantly sharp to critters. They are a great organic solution, and have the added bonus of not degrading over time, so when you plant them with long-lived bulbs they stick around! Being paranoid now, I also add a sprinkling of pelletized castor oil to the top layer (available in most garden centers), which I’m pretty well satisfied is also repellant to moles and voles (and organic–though it must be reapplied (on the top of the soil) at least annually).
5. Finally, fertilize, fertilize, fertilize! For bulbs, spring and fall. You’ll be amazed that plants generally will be bigger, with better foliage color, and bigger and more blooms. Bulbs are one of the few things that should be fertilized at planting. And let the spent foliage turn brown before trimming it back–bulbs need all the photosynthesis they can get!
All this talk of tulips–and we never even got to lilies! Do yourself a little kindness and go for it!
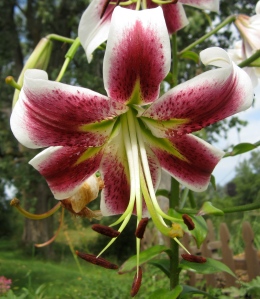
Lilium “Silk Road”–This amazing variety is taller than I am, even in partial shade! Just one flower looks great in vase, because they are about 10″ across. So you can leave the rest on the plant and them enjoy outdoors.
 Fall was a wee bit hectic–not much time for projects, let alone time to blog about them. But if it’s winter there must be a project or two percolating. The trick is to get it out of my head and onto the workbench. So to start the new year off easy, here’s an idea that took much less than a day to execute–even including the inevitable trip to the home center. (Apparently it’s the dog who uses up all the sandpaper without replacing it. She’s a busy pup!)
 I’ll share the inspir-ation photo with you from the Art Institute of Chicago Gift Catalog. Love, love, love these fish. They are in my new accent color (persimmon-ish). They are tall-ish (remember to think UP when you are creating tablescapes…folks tend to spread out without going up). They fit into an awkward space that I always have trouble filling on top of some shallow bookshelves. And to me, fish are just happy. I wanted them bad, but couldn’t really justify buying something new when I have tons of unused STUFF in every box in every closet–and we won’t even discuss the basement.
 Inspiration struck when I noticed three wooden shoe lasts collecting dust in a basket. They were hand-me downs from my mom, who is a much better housekeeper than I am, and quite willing to pick up 16 little things to dust around them. Not me. I recognized the cool factor of the old lasts, but didn’t know how to display them in a way that I could live with–until I thought of those fish.
 I got my husband to use a router to make a decorative edge on the base, but you can easily get the same effect by gluing on some purchased moulding. You will need a saw (a handsaw will do, but a circular saw is faster–don’t be afraid) and a drill (my fabulous sister gave me a cordless drill for Christmas–real women own drills!).
 You will need to sand the wood smooth, then paint, or stain and seal the display stand. After doing some tests I decided to go with a pickled oak stain and a tung oil finish (wipes on with a rag, and is easy cleanup).


